Showing posts with label menu ideas. Show all posts

Tuesday, November 15, 2011

Thanksgiving Countdown Ideas: Easy Acorn Cookies

The Thanksgiving countdown is on. Only 9 more days until Turkey Day. Are you ready? Over the next couple of days I will be sharing some easy, last minute Thanksgiving decorating, crafting, and food ideas to help put the finishing touches on your Thanksgiving celebrations.

Today I am featuring these Easy Acorn Cookies that I made with the help of my master chefs, Charlotte, 2 and Wyatt, 5. They are super easy to put together, require no cooking, and the kiddos will love helping out.


Here is what you will need:

- Hershey's Kisses
- Mini Chocolate Morsels
- Nutter Butter Cookie Bites (Mini Nilla Wafers will also work)

Assembly is easy and fun:

1. If using the Nutter Butter Bites, take the sandwich cookies apart and remove the peanut butter filling. Place textured side down on a cookie sheet. If using Mini Nilla Wafers, place on cookie sheet with the flat side up.

2. Melt a small bowl of Mini Chocolate Morsels. Place a small amount of melted chocolate onto the bottom of a Hershey's Kiss and the stick the Hershey Kiss onto the flat side of a Nutter Butter Cookie. The melted chocolate is acting as your glue. You don't need a lot, just enough to make the kiss stick to the cookie. Let cookies set for a few minutes, allowing chocolate to harden.

3. Turn over the cookie and use the same chocolate "gluing" method to attach a Mini Chocolate Morsel to the top of the textured side of your Nutter Butter Cookie. Again, only a small amount of melted chocolate is needed to glue your mini morsel onto the cookie. Allow the chocolate to harden for a few minutes.

4. Place Acorn Cookies in a festive bowl, serve, and enjoy!

Monday, September 5, 2011

Carnival Mini Edible Designs

I am excited to announce that the Sheek Shindigs Etsy Shop is in the process of adding some great new products to help make your next Shindig one to remember! One of my favorite new products are these Carnival Mini Edible Designs. These edible decorations are flat-printed edible designs that can be applied to many food items (cakes, cookies, cupcakes, ice cream cakes) for a finished, professional look. They are prepared with edible food colors and absorb moisture from food products, becoming soft and melding with the food item that it is being applied to. They DO NOT contain: wheat, milk, eggs, fish, shell-fish (crustaceans) peanuts and/or tree nuts, are gluten free, and Kosher Certified.

So, what can you do with these fun, edible designs? Here is a suggestion: Upgrade your favorite small cookie!

White Chocolate Carnival Mini Cookies


1. Prepare your favorite cookies or use pre-made. TIP: make sure the cookies are no larger than 1.5” in diameter to fit into a chocolate or candy mold with 2” cavities.

2. Place Carnival Mini designs face down in the cavities of your candy mold.

3. Fill a parchment triangle with a melted chocolate to fill the mold. TIP: don’t use a metal tip in the bag, as its coolness will stiffen the chocolate too quickly.

4. Press cookies into the chocolate before it sets up; top off with melted chocolate if necessary. TIP: tap the entire mold on a counter top to level the chocolate.

5. Let set, and then remove coated cookies from the mold.

The final result is sure to impress!

Visit the Sheek Shindigs Etsy shop, here, to view this product and others, here. And don't forget to check back...more are coming soon!

Saturday, September 3, 2011

Banana Split Mini Bites

What a fun little twist on a classic ice cream dessert! These Banana Split Mini Bites created by Naomi of Bakers Royale are not only super adorable, but they allow your little ones to have a special sweet treat without completely overloading on sugar.

Image: Bakers Royale
Here are Naomi's simple instructions:

  • Use firm bananas and cut into 1 inch sections. Leave the peel on for easy handling, and with a melon baller, dig a well in the middle of each banana section.

  • Melt chocolate in the microwave and dip the bottom portion of the banana in chocolate and then dip it once again in either non-pareils or chopped peanuts. To quickly harden the chocolate, place dipped bananas in the freezer for five minutes.

  • Fill each well with ice cream (I filled mine with vanilla chocolate chip) and top with whip cream and a maraschino cherry.


  • What a fun, kid-friendly dessert idea. I hope that you enjoy. Stop by Bakers Royale for other great recipes and ideas, here.

    Tuesday, June 21, 2011

    Patriotic Dessert Ideas

    Need some Patriotic Dessert Ideas to help inspire you as you gear up to celebrate the 4th? Not only are these super cute, but they require very little prep time, allowing you more freedom to enjoy the festivities along with everyone else. Here are a few of my favorites. Dessert doesn't get much easier than this!

    Patriotic Berry Medley: Everyone loves a little berries and cream! Gather some of your favorite glasses or dessert dishes and layer fresh strawberries, whipped cream, and blueberries to create this light layered dessert.

    {Image: Supernatural Botanicals}

    Spangled Sandwich Pops:  To create these Spangled Sandwich Pops, simply skewer a mini ice-cream sandwich onto a popsicle stick and adorn with patriotic sprinkles. Place in a colorful cupcake liner and sit back and relax!

    {Image: Family Fun}

    Strawberry Shortcake Popsicles: Yum! These Strawberry Shortcake Popsicles from Bakers Royale will satisfy young and old alike. The only ingredients that you will need are strawberries, vanilla oreos, and yogurt. Visit Bakers Royale, here, for the recipe and instructions.

    {Image: Bakers Royale}

    Watermelon Pop Stars: Watermelon is a summer-time staple (at least it is in our house). Why not make it the star of your July 4th celebration? To create these yummy pops, use a cookie cutter to cut star-shaped pieces of watermelon from 1-inch slices. Place star on a popsicle stick and lay onto a foil-lined baking sheet. Cover with foil and freeze for 1 hour or until firm.

    {Image: Family Fun}

     What are you serving on the 4th?

    Saturday, June 18, 2011

    Fruity Summer Snack Ideas

    Looking for some kid-friendly Summer Snack Ideas that are as healthy as they are fun? Take advantage of the season's freshest produce and wow your littlest fans with these fruity ideas:

    Fruit Pops: Move over fruit kabobs, these adorable FRUIT POPS from Bakers Royale are ready to steal the show! Not only are they pretty to look at, but they are healthy and super easy to make. Just grab your favorite fruits (watermelon and cantaloupe are pictured below), a cookie cutter, and a few pop sticks to put together this kid-friendly snack.

    {Image: Bakers Royale}

    Fruit Punch Popsicles: I've never met a kid that doesn't enjoy cooling off with a cold popsicle on a hot summer day. These frozen Fruit Punch Popsicles will not disappoint! Packed with a serving of fruit per popsicle, they will please young and old alike at your next summer shindig! To make, combine 3 cups of sliced fruit into a large mixing bowl. Spoon the fruit mixture into 8 popsicle molds and then fill each mold with your choice of juice. Place a popsicle stick into each mold and freeze for at least 4 hours, until frozen solid.

    {Image: Kitchen Daily}
     
    Waffle Cone Fruit Cups: Okay, these fruit-filled cones may not produce that same reaction as they would if they were filled with ice cream BUT they will provide your guests with a healthy dessert option. Waffle Cone Fruit Cups are easy to serve, won't melt, and are sure to make one of the day's daily fruit servings a little bit sweeter!

    {Image: Pinterest}

    Shark Fruit Bowl: If you are hosting a pool-side party this summer, this Shark Fruit Bowl is a must! While it appears to require some creative cutting skills and a little time, the finished product is sure to be a hit. Sun Scholars offers a great tutorial on recreating this watermelon masterpiece.


    {Image: Pinterest}

    Any other fun fruity summer snack ideas?? Please share!

    Tuesday, May 31, 2011

    {What's Cooking?} Cool Down with Homemade Italian Ice

    This week's What's Cooking? recipe will help you beat the heat this summer: Homemade Italian Ice. Not only is this recipe easy to make, but it is a crowd pleaser for young and old alike. Enjoy!


    Italian Ice

    Ingredients:
    - 1 cup water
    - 2 cups sugar
    - 1 cup fresh lemon juice (you can substitute with any flavoring of your choice)
    - Ice cube molds
    - Food processor

    Directions:
    Mix 1 cup water to 2 cups sugar. Bring to a boil while stirring to make a simple sugar. Remove from heat and add lemon juice (and a little zest if you like). Pour into ice cube molds and place in freezer. Once close to frozen (it will never fully freeze) remove from freezer and place cubes into food processor. Process until slushy. Garnish with lemon rind or fresh fruit.

    Thursday, May 19, 2011

    {What's Cooking?} Garden Sliders

    A couple of weekends ago my husband and the kiddos helped me plant a small summer garden. I love fresh summer vegetables! They have always been a season staple for my family, as my grandfather has been producing some of the best local veggies in his annual garden ever since I can remember. I decided to start the summertime tradition of growing a vegetable garden with my own children this year, though on a much smaller scale. After all of our planting I found myself feeling hungry, which resulted in a good rummage through my recipe "stash" for something fresh and new. I ended up coming across the perfect recipe for a summertime appetizer or light lunch entree from Better Homes and Gardens: Garden Sliders. This recipe allows you to take full advantage of the season's freshest produce, whether using vegetables from your own garden or a local farmers market. These bite-sized sandwich yummies combine grilled summer squash, crisp cucumbers, and tomato with a hearty white bean dip to create a healthy and satisfying summertime snack. Hungry yet? I am!

    Photobucket

    Garden Sliders

    Ingredients
    - 1 15- to 16-oz. can Great Northern or cannellini beans, rinsed and drained
    - 2 Tbsp. olive oil
    - 2 cloves garlic, minced (1 tsp.)
    - 1/2 tsp. Italian seasoning, crushed
    - 1 medium yellow summer squash, cut into 1/4-inch-thick slices
    - 24 1/4-inch-thick slices baguette
    - 2 medium roma tomatoes, cut in 1/4-inch-thick slices
    - 1 small cucumber, cut into 1/4-inch-thick slices
    - Small celery top sprigs, small tomato wedges, and/or pickle slices (optional)

    Directions
    1. For bean spread, in blender or food processor combine beans, 1 tablespoon of the oil, the garlic, and Italian seasoning. Cover; blend or process until smooth. Season with salt and ground black pepper.
    2. To grill squash, toss squash slices with remaining tablespoon olive oil. Place in a grill basket. Place basket directly over medium coals for about 5 minutes or just until squash is tender, turning once.
    3. Spread one side of each bread slice with bean spread. Top half of the bread with tomato, squash, and cucumber slices. Top with remaining bread slices, spread side down. Secure sandwiches with wooden picks. Top with celery sprigs, tomato wedges, and/or pickle slices.

    Makes 12 appetizers-size sandwiches.

    Make-Ahead
    Make the bean spread up to 2 days ahead; refrigerate, covered. Slice vegetables up to 24 hours ahead. Assemble sliders 2 hours ahead.

    Thursday, March 31, 2011

    April Fools' Day Recipes

    Any fun tricks up your sleeve for April Fools' Day tomorrow? Here are some tricky recipe ideas that are sure to FOOL your family and bring some fun to the day.

    These fake-out desserts from the Food Network Magazine are sure to trick your loved ones and friends:


    1. April Fools' Sushi (Rice Krispies Nuggets)
    2. April Fools' Crab Cakes (Fried Ice Cream)
    3. April Fools' Fries (Cinnamon-Sugar Sticks)
    4. April Fools' Lasagna (Banana Pudding Cake)

    This April Fools' Berry Soda Recipe from Taste of Home looks like a tasty berry beverage ready to be sipped. It's actually a tricky cup of gelatin so keep a spoon handy!


    Taco Salad for dessert? Your little ones will love these tricky ice cream waffle bowls from Taste of Home once they realize you really ARE serving dessert.

    Wednesday, March 16, 2011

    A Cupcake Shooters Container Giveaway!

    A few weekends ago I had the privelege of getting together with a group of amazingly talented women that are local to the Northern VA, DC, MD area. It was a lunch date filled with inspiration, motivation, and information, not to mention GREAT company! One of these fabulous women was Kate of CupKate's Event Design. I liked Kate from the beginning, but I LOVED Kate after she introduced me to a fabulous new cupcake concept: Cupcake Shooters! I am not sure where I was when these popped up, but I am so glad that I know about them now. Thanks Kate!


    Aren't these a brillant idea! What a fun twist on the traditional cupcake for your next Shindig. They could be the main dessert attraction or stand on the sidelines as a fabulous party favor. My own kids tried them out and gave rave reviews. They loved the "fun" factor and I loved the fact that they eliminated the usual crumbly, icing- covered mess that a "normal" cupcake leaves in our house. Major bonus! In addition to offering amazing full party design, custom dessert tables and online event consultation, CupKate's Event Design is now selling push-pop containers over at Etsy. Now you can make your own Cupcake Shooters for your next Shindig!


    CupKate's Event Design is this week's Giveaway sponsor and will be awarding one lucky follower with 2 dozen push-pop containers! Here's how you can ENTER TO WIN:

    Become a follower of Sheek Shindigs (if you aren't already) and ...

    1. Become a follower of the CupKate's Event Design blog, here, and leave a comment that you did so.
    2. "Like" Sheek Shindigs on Facebook and leave a comment that you did so.
    3. "Like" CupKate's Event Design on Facebook and leave a comment that you did so.
    4. Post a link to this Giveaway on your Facebook page and leave a comment that you did so.

    This giveaway will be open to entries from now (March 16th ) until Wednesday, March 23rd at 11:59 pm. You must be a Sheek Shindigs follower (or become one) to be elegible to win. Each person may enter up to 4 seperate times. A random winner will be chosen and announced on Thursday, March 24th. So...go check out these fun push-pop containers at the CupKate's Event Design Etsy shop and enter to win!

    Good Luck!

    Sunday, March 13, 2011

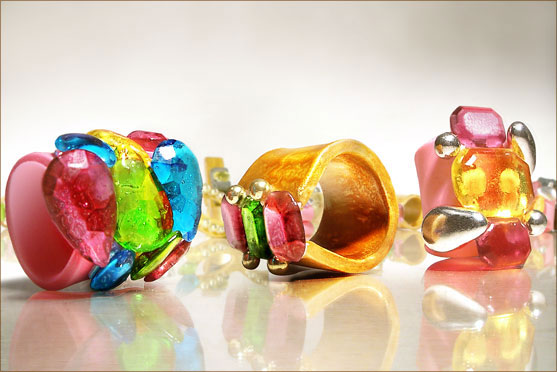
    Not Your Average Ring Pop!

    I recenlty saw a Facebook post from one of my fellow party girls (thanks Christi of P is for Party!) that I knew I had to share with all of you. Need a fun way to accessorize your next Shindig? How about adding some couture candy jewerly from Artesanal Sweets! These definitely are not your average "ring pops"!


    Chef Natascha de los Angeles of Artesanal Sweets is a New york City native born into a family of chefs and artists. With 10 years of French fine dining experience and a life time of exposure to haute cuisine and fine arts, Natascha and Artesanal Sweets "offers couture cakes, cupcakes, cookies, and candy jewerly that are not only visually exciting, but unbelievably fresh and delicious".


    Let's be honest. Would you really even care how these beauties tasted if you got the chance to host one on your finger for the night? Not me. "Delicious" would just be a bonus! You can visit Artesanal Sweets and see more of their amazing offerings, here.

    Friday, March 11, 2011

    What's Cooking?: A Collection of Recipe Favorites

    Ever since our youngest has turned 2 and become a little more independent, I feel like I am re-discovering my love of cooking and food. I have always loved to bake for special occasions but cooking just wasn't my thing. I think that it probably had to do with trying to occupy 3 young children while I was attempting to prepare the night's meal or that fact that I wasn't always the best at planning out our menu. Either way, my new-found love of discovering recipes that our family can prepare together and enjoy has inspired me to start a collection of posts called {What's Cooking?}. I will be sharing family favorites as well as great new recipe finds. Appetizers, entrees, desserts, and everything in between will be included. Maybe some of my favorites will make their way into your home. Whether you add them to your weeknight menu line-up or share them with guests at your next Shindig, I hope that I am able to inspire you to re-discover your love of food as well!

    Last week I shared the first recipe in the {What's Cooking?} collection, Grilled Zucchini Poppers. This week's recipe is a new Cooking Light find that our family just recently tried and LOVED. It is healthy, hearty, and easy to prepare for a quick weeknight meal.


    Caprese Wraps with Chicken

    Ingredients
    2 tablespoons olive oil
    2 tablespoons white wine vinegar
    1/4 teaspoon kosher salt
    1/4 teaspoon black pepper
    4 cups prechopped hearts of romaine lettuce
    1 1/2 cups shredded skinless, boneless rotisserie chicken breast
    3/4 cup (3 ounces) fresh mozzarella cheese, chopped
    1/2 cup fresh basil leaves, torn
    1 pint cherry tomatoes, quartered
    Cooking spray
    4 (2.8-ounce) multigrain flatbreads (such as Flatout)
    1 large garlic clove, halved

    Preparation
    1. Combine first 4 ingredients in a large bowl, stirring with a whisk. Add lettuce and next 4 ingredients (through tomatoes), tossing to coat.

    2. Heat a large nonstick skillet over medium-high heat. Coat pan with cooking spray. Working with 1 flatbread at a time, cook bread 1 minute on each side or until toasted. Rub 1 side of each flatbread with cut sides of garlic. Arrange 1 1/2 cups chicken mixture in the center of each flatbread; roll up.

    * A few side notes: I do not eat meat but my husband and oldest son do. So, I prepared all of the ingredients and added the chicken in at the end, allowing the meat-free wraps to be prepared first. I have used balsamic vinegar in place of the white wine vinegar...yummy! Also, you can use any type of shredded chicken that you have leftover or on hand. My husband used Tyson's All Natural Crispy Chicken Strips one night and loved the result. Experiment and have fun!

    Nutritional Information
    Calories:328
    Fat:15.9g (sat 4.5g,mono 6.2g,poly 2.7g)
    Protein:30.3g
    Carbohydrate:22g
    Fiber:9.5g
    Cholesterol:61mg
    Iron:2.9mg
    Sodium:573mg
    Calcium:180mg

    Saturday, March 5, 2011

    {What's Cooking?} Grilled Zucchini Poppers

    I love coming across new recipes that are as fun to make as they are yummy. These Grilled Zucchini Poppers certainly look like they belong where something FUN is going on! Maybe it is my love of vegetables. Maybe it is my craving for a lighter, summer-time menu. Either way, these lovelies will be making an appearance at our dinner table in the near future.


    Grilled Zucchini Poppers

    Ingredients

    •1 grilled green zucchini, thinly sliced brushed with olive oil, aged balsamic and salt and pepper
    •1 red pepper julienne, raw
    •1 bunch of arugula or greens
    •5 Oz goat cheese*
    •1 Oz sour cream*
    •1/2 Teaspoon of basil pesto
    •Lemon Thyme or Balsamic vinaigrette

    *You can substitute the goat cheese and sour cream in this recipe with 6oz. of riccotta cheese.

    Directions

    1. Lightly grill zucchini. On a sheet of plastic wrap lay out zucchini strips.

    2. Mix goat cheese and sour cream with pesto and spread a thin layer on top zucchini strips.

    3. Lay the peppers and a pinch of greens on the end of the strip and roll it up in plastic wrap.

    4. Refrigerate for up to two hours.

    5. To serve, slice into 1/4 inch pieces and drizzled top with vinaigrette.

    This recipe is from Andrea Correale and Celebrations.