Wednesday, September 28, 2011

{What's Cooking?} Pumpkin Spice Creme Brulee

I just couldn't hold out any longer. I started bringing out some of my fall decorations yesterday and I am now officially in "fall mode". Love it! There are so many wonderful things that I associate with the fall season: cooler weather, colorful leaves, watching football as a family (okay, I really have no interest in watching football, but I love cuddling with my family while they watch and making fun snacks for everyone to enjoy), and the smell and taste of anything pumpkin. Pumpkin just takes me to that comfy, cozy feeling that I associate with fall. The sight, the smell, the taste...even the thought of anything pumpkin. So, while on a quest today to find a new pumpkin recipe to help kick off this wonderful season, I came across this recipe from Better Homes and Gardens for Pumpkin Spice Creme Brulee. The recipe itself sounds great, but the presentation of the dessert is what got my attention. I love the idea of serving dessert in miniature pumpkins!

Image: Better Homes and Gardens

Wouldn't these dessert filled mini pumpkins be perfect on your Thanksgiving table. They are definitely going on my "possibilities list" for this year.

Pumpkin Spice Creme Brulee

Ingredients:
  • 2 cups whipping cream (no substitutes)
  • 3 egg yolks, lightly beaten
  • 2 eggs, lightly beaten
  • 1/2 cup sugar
  • 1/2 cup canned pumpkin
  • 1 teaspoon ground cinnamon
  • 1 teaspoon ground ginger
  • 1/4 teaspoon salt
  • 1/4 teaspoon ground cloves
  • 10 baby pumpkins
  • 1/4 cup sugar
Directions:

1. Preheat oven to 350 degrees F. In a small saucepan, heat whipping cream over medium heat just until bubbly. Remove from heat; set aside.
2. Meanwhile, in a medium bowl, combine egg yolks, eggs, the 1/2 cup sugar, pumpkin, cinnamon, ginger, salt, and cloves. Beat with a whisk or rotary beater just until combined. Slowly whisk the hot whipping cream into the egg mixture.
3. Use a small serrated knife to cut off the top 1/2-inch of the baby pumpkins. Discard the tops. Use a spoon to scoop out the seeds.
4. Place the pumpkins in a roasting pan. Divide custard mixture evenly among the pumpkins. Place roasting pan on oven rack. Pour enough boiling water into the roasting pan to reach halfway up the sides of the pumpkins.
5. Bake for 30 to 40 minutes or until centers appear nearly set when gently shaken. Carefully remove pan from oven. Remove pumpkins from water; cool on a wire rack. Cover and chill for at least 1 hour or up to 8 hours.
6. Before serving, let custards stand at room temperature for 20 minutes. **Meanwhile, for caramelized sugar: in a heavy 8-inch skillet, heat the 1/4 cup sugar over medium-high heat until sugar begins to melt, shaking skillet occasionally to heat sugar evenly. Do not stir. Once sugar starts to melt, reduce heat to low; cook 3 to 5 minutes more or until all of the sugar is melted and golden brown, stirring as needed with a wooden spoon.
7. Quickly drizzle caramelized sugar over the custards. (If sugar starts to harden in the skillet, return to heat, stirring until melted.) Serve immediately. Makes 10 filled pumpkins or 6 custard cups.
* Instead of the pumpkins, you can use six 3/4-cup souffle dishes or 6-ounce custard cups. Place the souffle dishes or custard cups in a 13x9x2-inch baking pan.
**Culinary Torch Method: Instead of caramelizing the sugar in the skillet as directed in steps 6 and 7, sprinkle sugar evenly over custards. Use a culinary torch to caramelize the sugar.

Monday, September 26, 2011

Operation Shower: Sea to Shining Sea

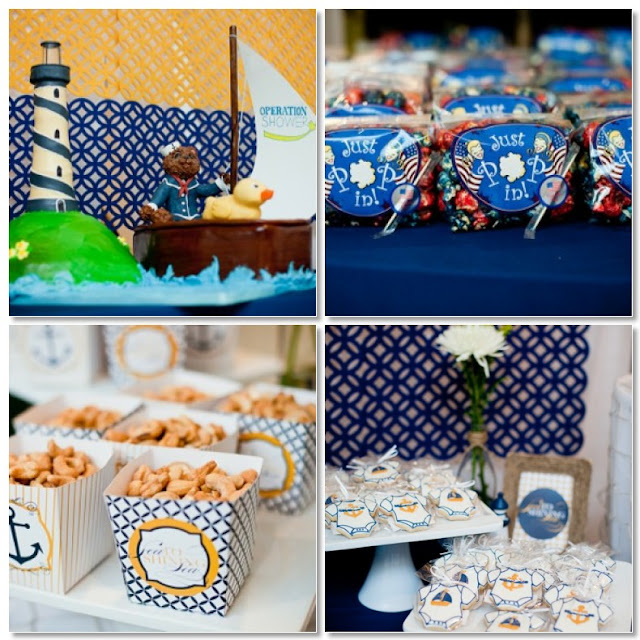
Two weeks ago I had the privilege of helping out with my second Operation Shower event, this time in Norfolk, VA. This event was organized to "shower" expecting women whose husbands were deployed and serving on the USS George H.W. Bush (CVN77) and was given a coordinating nautical "Sea to Shining Sea" theme.


Operation Shower's Chief Event Organizer, Amy Belle Isle, did another fabulous job designing the event. Nautical elements were incorporated throughout, including the graphic designs, table centerpieces, and food and dessert tables. One of my absolute favorites designed all of the graphics for the shower, Lindi of Love the Day. She rocks! Other amazing talents that were helping out with the event included Chris of Celebrations At Home, Ebony of Sparkling Events and Designs, and Deanna of 5 to 9 Events. These women made an already worth-while event a complete joy to be a part of. It is so nice to be able to come together and work with such a talented group of women for an amazing organization AND have so much FUN at the same time. Love them all!


Any guesses what Amy used to create the dessert table's backdrop? Place mats! It was such a creative idea and it looked great at the event. Not so much fun hanging it, though :)  Sugarland Bakery came all the way from Chapel Hill the morning of the shower to deliver the adorable nautical themed cake that they created for the event. These girls are seriously talented and equally as sweet themselves! Just Pop In donated the mini popcorn bags and Firefly Confections sent the cutest little cookies for the event.


Many generous vendors came together and donated so many wonderful items for this event. In addition to the "showers in a box" that each mother received, everyone was gifted a stroller, bath tub, clothing, diaper bags, boppy's, handmade booties and hats, diapers, and much, much more. It was an amazing day full of celebrating, honoring, and truly "showering" these women. They are part of a much larger group of men, women, and families that sacrifice so much for our country every day and I hope that they felt the love, appreciation, and support that everyone involved with Operation Shower strives to bestow upon them on their special day . I truly feel blessed and am grateful to have been able to participate in another Operation Shower event.


Also, a big thank you to Stephanie of Lifeography for all of the wonderful photographs. You can learn more about Operation Shower, what they do, and how you can help, here.


The girls: Chris (Celebrations At Home), Amy (Operation Shower), me  (Sheek Shindigs), Ebony (Sparkling Events and Designs), and Lindi (Love the Day).

Friday, September 23, 2011

A Vintage Home Art Giveaway!

This dreary Friday needs a little cheer so how about another fabulous Giveaway! This week's Giveaway is being sponsored by Ayesha Atelier and her etsy shop, Vintage Home Art. Vintage Home Art has much to offer, including beautiful cakestands, dessert pedestals, cupcake stands handcrafted from vintage china, elegant vintage teacups, milk jugs, sugar bowls,  "and a smattering of upcycled serving stands!".


Ayesha loves vintage fine china. In her words, "it's light yet strong, beautiful yet functional. And, of course, they literally don't make them like that any more! My cake stands bring lovely vintage plates, each with its own charm, history and beauty into people's homes, where they can be admired and enjoyed for years to come".

Ayesha's studio overflows with vintage china cakestands, hand-decorated pottery, upcycled homewares, a collection of bone china, paintings of all kinds, and stack of old linens. Ayesha also designs and sells cushion covers, tableclothes, and throws.

Ayesha and Vintage Home Art is offering this week's Giveaway winner a $50 shop credit which can be used towards the purchase of any item in the Vintage Home Art etsy shop! Not only would one of these items be a wonderful addition to your own collection of serving pieces, but they would make amazing gifts for the upcoming holiday season. Stop by Vintage Home Art, here, and check out what Ayesha has to offer. This is one of my personal favorites... I just adore the teacup topped, tiered cakestand!


To ENTER THIS WEEK'S GIVEAWAY:
Become a follower of the Sheek Shindigs blog if you aren't already and...

1. Leave a comment on this post about your favorite item/items.
2. Follow Sheek Shindigs on Facebook, here.
3 Follow Ayesha and Vintage Home Art on Facebook, here.

You may enter to win up to 3 separate times. Giveaway winner must be a Sheek Shindigs follower (so if you aren't, simply become one!). All entries must be made by 11:59 on Thursday, September 29, 2011. A random giveaway winner will be selected and announced on Friday, September 30, 2011. Good luck and thanks for following!

Tuesday, September 20, 2011

{Party Inspiration} Apples, Apples!

I love Fall! The colorful leaves, the crisp air, and all of the delicious APPLES! Yes, I said apples. There is just something so wonderful to me about fresh, fall apples. Don't you agree? I was inspired by the recent cool down in Virginia and ready to style a Fall-themed party. My mind naturally focused on an APPLE theme (apple cider, candy apples, cider donuts...) and this is what I came up with for my inspiration:

An Apples, Apples! Themed Party Inspiration Board


This apple-themed party would be fun for a back-to-school celebration, an apple picking party, a fall birthday, or just to celebrate the season with your family and friends. What comes to mind when you think of Fall?

Image Credits:
1. Apple Cupcakes: What's New, Cupcake?  2. Apple Invitation: The Homespun Hostess  3. Candy Apples: Wedding by Color  4. Apples Sign: Hello Naomi  5. Cider Donuts: Handmade Simple  6. Apple Wreath: Faux Flora  7. Apple Plates Craft: Two Shades of Pink  8. Apple/Floral Centerpiece: Style Me Pretty  9. Apple Cider: Google

Monday, September 19, 2011

{Halloween} A Ghostly Glass of Milk

Although we still have well over a month until Halloween arrives, I couldn't help but share a little sneak peek of a Halloween Breakfast that I have been working on to go along with some new Halloween party items coming to the Sheek Shindigs Etsy Shop this week. Aren't these Ghostly Glasses of Milk cute! They would be a fun option for any type of Halloween celebration, whether it be a playdate, costume party, or just to great your little goblings on Halloween morning.


These are incredibly easy to re-create. Your litte ones could even help out!

Supplies

- Glass or plastic bottles/jars ( I used empty Starbuck's Frappuccino bottles)
- Plastic googly eyes (I used the self-adhesive kind)
- Black paper, scissors, and your imagination
- Glue
- Milk!

Directions

Fill your beverage container with milk. Place googly eyes on container and glue if necessary. Using your black paper, cut out a mouth and glue it to the container (you could also get creative and add eyebrows and other funny expressions if you wanted to).

 Enjoy a Ghostly Glass of Milk!

Thursday, September 15, 2011

Heading Out for Operation Shower

Tomorrow morning I will be heading to Norfolk, VA bright and early to help out an AMAZING organization called Operation Shower this weekend. If you have followed me for awhile, you may remember that I was fortunate enough to be able to be a small part of another Operation Shower event last October in Washington, DC. Being able to help out with that event was such a positive experience, so I am thrilled to have the opportunity to come back and help out this time around.


For those of you that aren't familiar with Operation Shower:

"Operation Shower is a 501(c)(3) non-profit organization that provides joyful baby showers for military families to ease the burden of deployment.
For military families who are expecting a new baby and are experiencing or have recently experienced deployment, we accomplish our mission through:
  • hosting amazing baby showers
  • delivering high-quality products
  • creating a shared experience
  • partnering with organizations to provide value-added services, such as health-related information
Operation Shower was founded specifically because we know that moms in a military family who hold it all together at home — moms who go through a pregnancy without their spouse by their side, deployed to a another part of the world, proudly serving our country, but wishing they could do more for those at home — these moms deserve our support, our thanks, our love and of course, they deserve a party!".

Here are a few pictures from a shower that Operation Shower held back in April at Camp LeJeune, NC. Pretty amazing!


I am looking so forward to this weekend and can't wait to share details and pictures with you later next week. In the meantime, you can learn more about Operation Shower and how you can help out this amazing organization over at their website or on facebook.

Tuesday, September 13, 2011

Pretty Printable Place Cards

Pretty Printable Place cards....now say that 3 times fast!

Amy of Delightful Distractions created these sweet printable placecards/gift tags/ note cards that you can download for FREE and put to use in so many different ways. Don't you love them!


So many fun ideas for how to use these come to my mind. Most involve celebrating something special with my little girl... they remind me of her.  You can download you own set of these printables, here. And, don't forget to stop by Delightful Distractions, here, to follow Amy and see more of her wonderful creations. Thank you for sharing these, Amy!

Monday, September 12, 2011

{DIY} Party with Paper Rosettes!

Have you noticed one of the newest party paper decor trends? Time to move over tissue paper pom poms... Paper Rosettes are taking over the party scene!

Image: KayLice Events
Image: Martha Stewart

Image: Source
Image: Frog Prince Paperie
While I loved the tissue paper pom poms, paper rosettes are quickly winning me over. They are extremely versatile and in my opinion, easier to make than the pom poms. Paper Source offers a great tutorial for a basic paper rosette and Martha Stewart offers one for a paper rosette with more of a flower-like feel. You can also make mini versions for accessorizing just about anything that your heart desires (favor bags, party hats, banners, tables...).

Any other fun ideas for the paper rosette?

Enjoy, and happy crafting!

Friday, September 9, 2011

{Crafty Ideas} A Colorful Pencil Necklace

I came across this fun, colorful craft project a few weeks ago and thought that this would be a perfect time to share it with the start of school and the need for a little sunshine in our neck of the woods. It has been raining almost non-stop for an entire week here! We need some rainbows and bright skies!

Kate of Mini-eco created this fun pencil necklace using a junior hacksaw, tiny drill bit, sandpaper and some string. Each pencil-bead is 0.6mm in length.


To create, hold pencil firmly and cut a .6mm length section using a junior hacksaw. Once pieces are cut, lightly sand each end of each piece smooth. Drill a small hole through each pencil piece and string with your thread/string. While you will have to do the "heavy" crafting work, little ones will enjoy helping you create the pattern and stringing them as you go.

These would be a cute craft or favor for a rainbow or art themed party, don't you think? I hope that you enjoy!

And, just as I am wrapping this post up, sunny skies are trying to peak through. Hooray!

Monday, September 5, 2011

Carnival Mini Edible Designs

I am excited to announce that the Sheek Shindigs Etsy Shop is in the process of adding some great new products to help make your next Shindig one to remember! One of my favorite new products are these Carnival Mini Edible Designs. These edible decorations are flat-printed edible designs that can be applied to many food items (cakes, cookies, cupcakes, ice cream cakes) for a finished, professional look. They are prepared with edible food colors and absorb moisture from food products, becoming soft and melding with the food item that it is being applied to. They DO NOT contain: wheat, milk, eggs, fish, shell-fish (crustaceans) peanuts and/or tree nuts, are gluten free, and Kosher Certified.

So, what can you do with these fun, edible designs? Here is a suggestion: Upgrade your favorite small cookie!

White Chocolate Carnival Mini Cookies


1. Prepare your favorite cookies or use pre-made. TIP: make sure the cookies are no larger than 1.5” in diameter to fit into a chocolate or candy mold with 2” cavities.

2. Place Carnival Mini designs face down in the cavities of your candy mold.

3. Fill a parchment triangle with a melted chocolate to fill the mold. TIP: don’t use a metal tip in the bag, as its coolness will stiffen the chocolate too quickly.

4. Press cookies into the chocolate before it sets up; top off with melted chocolate if necessary. TIP: tap the entire mold on a counter top to level the chocolate.

5. Let set, and then remove coated cookies from the mold.

The final result is sure to impress!

Visit the Sheek Shindigs Etsy shop, here, to view this product and others, here. And don't forget to check back...more are coming soon!

Saturday, September 3, 2011

Banana Split Mini Bites

What a fun little twist on a classic ice cream dessert! These Banana Split Mini Bites created by Naomi of Bakers Royale are not only super adorable, but they allow your little ones to have a special sweet treat without completely overloading on sugar.

Image: Bakers Royale
Here are Naomi's simple instructions:

  • Use firm bananas and cut into 1 inch sections. Leave the peel on for easy handling, and with a melon baller, dig a well in the middle of each banana section.

  • Melt chocolate in the microwave and dip the bottom portion of the banana in chocolate and then dip it once again in either non-pareils or chopped peanuts. To quickly harden the chocolate, place dipped bananas in the freezer for five minutes.

  • Fill each well with ice cream (I filled mine with vanilla chocolate chip) and top with whip cream and a maraschino cherry.


  • What a fun, kid-friendly dessert idea. I hope that you enjoy. Stop by Bakers Royale for other great recipes and ideas, here.

    Friday, September 2, 2011

    {Real Parties} A Picnic Party

    Today I am sharing a party submission from Jozen of Lola's Girl. Jozen recently celebrated her daughter's 6th birthday by incorporating one of her favorite summertime activites and throwing her a Picnic Party! 


    Guests were asked to bring their own picnic blankets or lawn chairs and were treated to quite a picnic spread for the birthday celebration.The menu included hot dogs, hamburgers, traditional Filipino barbecue on sticks, salad, and fresh fruit.


    A diy lemonade stand provided guests the opportunity to create their own picnic beverage....I love this idea and I would image that it was a hit with the kids as well!


    Jozen put together a mini dessert table which featured mini cupcakes, donut holes, brownie bites, oreos, and mini cinnamon buns. So cute and sooo yummy!


    Every birthday girls needs a cake! This cake was extra special because the birthday girl's aunt baked it for her. Isn't it beautiful!


    The birthday celebration ended with a movie under the stars for all of the guests to enjoy. What a great way to finish off a special day and a wonderful celebration!


    Jozen, thank you for sharing your daughter's party with Sheek Shindigs. You did a wonderful job. You can see more of the details from this party at Lola's Girl, here.