


Wednesday, June 8, 2011
{DIY} The Paper Lantern Makeover
I LOVE this DIY tutorial from The Crafts Dept. (Martha Stewart). Give your plain paper lanterns a much needed makeover! With the help of tissue paper circles and double-sided tape, you can create these lovely hanging beauties for your next shindig. For a full tutorial and pictures, visit The Crafts Dept. here.


Monday, June 6, 2011
Light Up Your Outdoor Party
Outdoor parties and Summer go hand-in-hand. Here are some creative Outdoor Lighting Ideas to keep your party going strong long after the sun goes down.
An Abundance of Lanterns: The more the better!
Group a cluster of lit lanterns together to create a romantic midsummer night's mood.

Electric Lighting Options:
There are so many great electric lighting options out there if the element of fire is not a safe party option (especially if small children are going to be running around!). Bring a table lamp outdoors to brighten up a buffet. Use string lights to add color and glow to your setting and get out those stored away holiday lights to wrap columns and trees for some added fun!

A Faux Glow:
Faux candles and lanterns (OXO Candela DemiGlow Rechargeable LED Lights) are another alternative option if you plan on staying away from candles. They can provide hours of illumination to your outdoor shindig and can be recharged and reused again and again.


An Abundance of Lanterns: The more the better!
Group a cluster of lit lanterns together to create a romantic midsummer night's mood.

{Image: La Sweet Settings}
Electric Lighting Options:
There are so many great electric lighting options out there if the element of fire is not a safe party option (especially if small children are going to be running around!). Bring a table lamp outdoors to brighten up a buffet. Use string lights to add color and glow to your setting and get out those stored away holiday lights to wrap columns and trees for some added fun!

{Image: Real Simple}
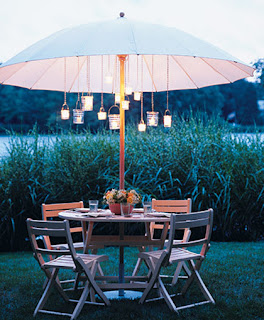
Eco-Friendly Lighting:
Grab some glass jars and wire that you already have at home to create this Eco-friendly lighting option. Simply wrap wire around the lips of your glass jars, bending a length of wire over the top to use as a handle, and then tie each wire handle to the length of twine, string, or small chains at even intervals and hang.

{Image: Country Living}
A Faux Glow:
Faux candles and lanterns (OXO Candela DemiGlow Rechargeable LED Lights) are another alternative option if you plan on staying away from candles. They can provide hours of illumination to your outdoor shindig and can be recharged and reused again and again.

{Image: Martha Stewart}
Origami Lanterns:
These colorful lanterns are origami "balloons" that have been fashioned around battery-operated lights, hung from bamboo poles, and finished off with ribbons. You can find DIY directions at Martha Stewart, here.

{Image: Martha Stewart}
Large Hanging Lanterns:
Fill various lanterns with votives, tea lights, and tapers and hang to create a warm glow over your guests. Sand, rocks, and rose petals are just some "filler" options to help secure your candles and dress up the bottom of your lanterns.

(Image: Martha Stewart}
Saturday, June 4, 2011
A Purple and Key Lime Inspiration Board
A couple of months ago I was asked to design a dessert table for an upcoming bridal shower. I have been especially excited about this project since the bride-to-be was one of my best childhood friends and we have been fortunate enough to stay in touch over the years. Since the shower is being held next weekend, I thought that I would give a sneak peak at what's to come. I chose a purple and gray color scheme for the dessert table with a touch of key lime green (key lime pie is the bride-to-be's favorite and will be featured on the dessert table). I wanted the table to have a modern, feminine feel and to reflect the shower's purpose...to celebrate LOVE. Here is the inspiration board that I created for the event. I can't wait to share my photos after the special day.


Thursday, June 2, 2011
{Free Printables} 101 Bits of Summer Fun!
Are you ready for summer? I am! With only few short weeks left until summer vacation offically begins in our house, I have been trying to plan some fun activites and day trips that the kids and I can enjoy together over the next couple of months. The other day I came across this inspirational 101 Bits of Summer Fun printable that was created by Laura Winslow. Laura compiled a list of fun, simple things to do with her kids this summer and turned it into a free downloadable printable for you and your family to enjoy as well. Print it out, post it up, and become inspired to enjoy some real quality time with your family this summer.


Tuesday, May 31, 2011
{What's Cooking?} Cool Down with Homemade Italian Ice
This week's What's Cooking? recipe will help you beat the heat this summer: Homemade Italian Ice. Not only is this recipe easy to make, but it is a crowd pleaser for young and old alike. Enjoy!

Italian Ice
Ingredients:
- 1 cup water
- 2 cups sugar
- 1 cup fresh lemon juice (you can substitute with any flavoring of your choice)
- Ice cube molds
- Food processor
Directions:
Mix 1 cup water to 2 cups sugar. Bring to a boil while stirring to make a simple sugar. Remove from heat and add lemon juice (and a little zest if you like). Pour into ice cube molds and place in freezer. Once close to frozen (it will never fully freeze) remove from freezer and place cubes into food processor. Process until slushy. Garnish with lemon rind or fresh fruit.
Friday, May 20, 2011
{DIY} Zig Zag Party Streamers
Looking for something to jazz up your next shindig? Check out these DIY Zig Zag Party Streamers by Oh Happy Day. All you need is colored paper and a pair of scissors. Yep, it's that easy.

Instructions and Photos from Oh Happy Day:
Step 1: Start with some colored paper in the shape of a rectangle. Start on one of the long sides and cut a strip about 1" wide but don't cut all the way through.
Step 2: From there measure about 2" from the first and cut again. Continue doing 2" cuts on that side of the paper.
Step 3: Turn the paper over and make cuts (but not all the way through) half way between the 2" sections. Et voilà! You have an accordion streamer to make you party festive.


So cool. So fun. So jazzy! Can't wait to try these out for myself sometime soon.
Thursday, May 19, 2011
{What's Cooking?} Garden Sliders
A couple of weekends ago my husband and the kiddos helped me plant a small summer garden. I love fresh summer vegetables! They have always been a season staple for my family, as my grandfather has been producing some of the best local veggies in his annual garden ever since I can remember. I decided to start the summertime tradition of growing a vegetable garden with my own children this year, though on a much smaller scale. After all of our planting I found myself feeling hungry, which resulted in a good rummage through my recipe "stash" for something fresh and new. I ended up coming across the perfect recipe for a summertime appetizer or light lunch entree from Better Homes and Gardens: Garden Sliders. This recipe allows you to take full advantage of the season's freshest produce, whether using vegetables from your own garden or a local farmers market. These bite-sized sandwich yummies combine grilled summer squash, crisp cucumbers, and tomato with a hearty white bean dip to create a healthy and satisfying summertime snack. Hungry yet? I am!

Garden Sliders
Ingredients
- 1 15- to 16-oz. can Great Northern or cannellini beans, rinsed and drained
- 2 Tbsp. olive oil
- 2 cloves garlic, minced (1 tsp.)
- 1/2 tsp. Italian seasoning, crushed
- 1 medium yellow summer squash, cut into 1/4-inch-thick slices
- 24 1/4-inch-thick slices baguette
- 2 medium roma tomatoes, cut in 1/4-inch-thick slices
- 1 small cucumber, cut into 1/4-inch-thick slices
- Small celery top sprigs, small tomato wedges, and/or pickle slices (optional)
Directions
1. For bean spread, in blender or food processor combine beans, 1 tablespoon of the oil, the garlic, and Italian seasoning. Cover; blend or process until smooth. Season with salt and ground black pepper.
2. To grill squash, toss squash slices with remaining tablespoon olive oil. Place in a grill basket. Place basket directly over medium coals for about 5 minutes or just until squash is tender, turning once.
3. Spread one side of each bread slice with bean spread. Top half of the bread with tomato, squash, and cucumber slices. Top with remaining bread slices, spread side down. Secure sandwiches with wooden picks. Top with celery sprigs, tomato wedges, and/or pickle slices.
Makes 12 appetizers-size sandwiches.
Make-Ahead
Make the bean spread up to 2 days ahead; refrigerate, covered. Slice vegetables up to 24 hours ahead. Assemble sliders 2 hours ahead.
Subscribe to:
Posts (Atom)


