Saturday, March 19, 2011

{DIY} Pom Pom Backdrop Tutorial

I have had many requests for a tutorial on how to make Pom Pom Backdrops. They are super easy, very inexpensive, and so versatile. These can be used as a backdrop for a dessert table, art on the wall to add to your parties decor, or as a "photo booth" backdrop.


To create, you will need:
  • 1 large piece of foam board or several smaller pieces of foam board, depending on what size you want the backdrop to be
  • Tissue paper, in assorted colors of your choice
  • Floral wire
  • Hot glue gun
  • Scissors

If you are using several pieces of foam board, begin by taping your foam board pieces together to create the overall backdrop size that you want. I suggest using a heavy tape, such as duck tape or packaging tape. Simply run tape along the seams of two pieces of foam board (on the backside).

Now you are ready to start making your tissue paper pom poms. Martha Stewart provides an excellent tutorial on how to do this, which I have provided below. (Pictures from Martha Stewart).


Step 1
Stack eight 20-by-30-inch sheets of tissue. Make 1 1/2-inch-wide accordion folds, creasing with each fold.

Step 2
Fold an 18-inch piece of floral wire in half, and slip over center of folded tissue; twist. With scissors, trim ends of tissue into rounded or pointy shapes.

Step 3
Separate layers, pulling away from center one at a time.

Now that your pom poms are made, begin gluing rows of pom poms onto your foam board backdrop using a hot glue gun. I suggest laying the board flat during this process and applying the glue at the center of the pom pom, where the wire has been wrapped. I chose to alternate colors but your backdrop design is only limited by your imagination. Have fun!

Thursday, March 17, 2011

For Japan With Love

This Friday Sheek Shindigs will be participating in the For Japan With Love Bloggers Day of Silence {no postings} to acknowledge and help raise awareness and respect for the devastation going on in Japan, as well as to help raise money for relief aid to Japan. Please stop by the For Japan With Love site and contribute if you are able to do so. Every little bit helps!

“All of the donations {For Japan, With Love} will go to ShelterBox, which provides emergency shelter and lifesaving supplies for families around the world who are affected by disasters at the time when they need it the most. Each large, green ShelterBox is tailored to a disaster but typically contains a disaster relief tent for an extended family, blankets, water storage and purification equipment, cooking utensils, a stove, a basic tool kit, a children’s activity pack and other vital items.”

Photobucket

Thank you for your support!

Wednesday, March 16, 2011

A Cupcake Shooters Container Giveaway!

A few weekends ago I had the privelege of getting together with a group of amazingly talented women that are local to the Northern VA, DC, MD area. It was a lunch date filled with inspiration, motivation, and information, not to mention GREAT company! One of these fabulous women was Kate of CupKate's Event Design. I liked Kate from the beginning, but I LOVED Kate after she introduced me to a fabulous new cupcake concept: Cupcake Shooters! I am not sure where I was when these popped up, but I am so glad that I know about them now. Thanks Kate!


Aren't these a brillant idea! What a fun twist on the traditional cupcake for your next Shindig. They could be the main dessert attraction or stand on the sidelines as a fabulous party favor. My own kids tried them out and gave rave reviews. They loved the "fun" factor and I loved the fact that they eliminated the usual crumbly, icing- covered mess that a "normal" cupcake leaves in our house. Major bonus! In addition to offering amazing full party design, custom dessert tables and online event consultation, CupKate's Event Design is now selling push-pop containers over at Etsy. Now you can make your own Cupcake Shooters for your next Shindig!


CupKate's Event Design is this week's Giveaway sponsor and will be awarding one lucky follower with 2 dozen push-pop containers! Here's how you can ENTER TO WIN:

Become a follower of Sheek Shindigs (if you aren't already) and ...

1. Become a follower of the CupKate's Event Design blog, here, and leave a comment that you did so.
2. "Like" Sheek Shindigs on Facebook and leave a comment that you did so.
3. "Like" CupKate's Event Design on Facebook and leave a comment that you did so.
4. Post a link to this Giveaway on your Facebook page and leave a comment that you did so.

This giveaway will be open to entries from now (March 16th ) until Wednesday, March 23rd at 11:59 pm. You must be a Sheek Shindigs follower (or become one) to be elegible to win. Each person may enter up to 4 seperate times. A random winner will be chosen and announced on Thursday, March 24th. So...go check out these fun push-pop containers at the CupKate's Event Design Etsy shop and enter to win!

Good Luck!

Tuesday, March 15, 2011

We're on a Leprechaun Hunt!

I am a sucker for family traditions. Our family has never had one for St. Patrick's Day, so I decided to come up with one to start this year. On Monday night, a little "leprechaun" snuck into our house while everyone was asleep and paid our kitchen a friendly visit. In addition to some crumbs and open wrappers from the food that he helped himself to, we discovered a few footprints on the kitchen table as well (Since our kitchen tabletop is tile, I just used washable markers to make the footprints. You could re-create "evidence" of your own by leaving a green note, footprints across a newspaper, green glitter...).


After close inspection of the evidence left behind and a little "hunt", we decided to make a Leprechaun Trap (a friendly one, of course!).


The first step was deciding on how to build our trap. I found instructions on how to make a box out of popsicle sticks at kaboose.com and decided that, with a few adjustments, it would be perfect for trapping a little leprechaun. We glued our trap together using larger popsicle sticks. This project was surprisingly easy with the help of my glue gun.


My 4 year old then decided that we needed to diguise our trap as a rainbow. Pretty clever, I thought. This was definitely his favorite part of our project.


We gathered some "gold" coins from our play kitchen and decided to make a path leading the leprechaun into our trap. We will have to wait and see what we turn up with in the morning...

{Party Inspiration} An Ice Cream Party

Everyone loves an Ice Cream Party and with the help of One Charming Party, yours will be the talk of the town! Sara and Brittany of One Charming Party put together some delicious Ice Cream Party photos, ideas, and free downloadable printables to get you started. Check them out:

Invitations: Set the stage for a fabulous party with these yummy Ice Cream Party invitations. You can get the free download, here.


Set-up Suggestions: Ice cream is the star of this party. One Charming Party suggests that you set up an ice cream bar with cute cups, a variety of flavors and an assortment of toppings so guests can make their own sundaes. Then give them a spoon and let them dig in!


A Sweet Treat for the Birthday Girl: Everyone deserves to feel special on their brithday and how could you not with such a cool birthday hat! One Charming Party provides step-by-step directions on how to make this sweet Ice Cream Cone Party Hat, here.


Stay Cool: Even an ice cream party deserves a cool cake. Take a simple ice cream cake and top it with chocolate ganache. Add a chocolate ice cream cone to the top to make it look like melted ice cream. Don’t forget the sprinkles.


Party Favors: After the party is over, send your guests home with a party favor in an empty ice cream container. Print out One Charming Party's labels onto adhesive backed paper and cut out. Fill the container with anything you’d like and tie it up with a pretty ribbon and a pink spoon. You can download the labels, here.


Best ice cream party ideas ever! Thank you for the amazing ideas and inspiration, Sara and Brittany.

Sunday, March 13, 2011

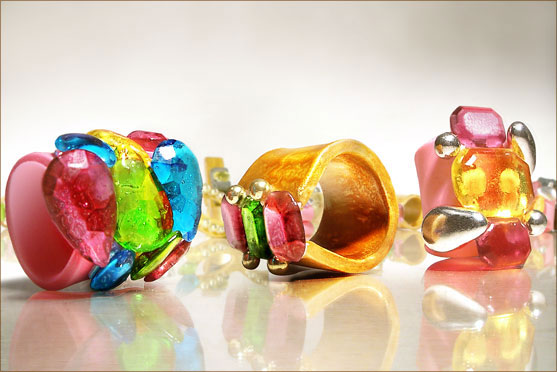
Not Your Average Ring Pop!

I recenlty saw a Facebook post from one of my fellow party girls (thanks Christi of P is for Party!) that I knew I had to share with all of you. Need a fun way to accessorize your next Shindig? How about adding some couture candy jewerly from Artesanal Sweets! These definitely are not your average "ring pops"!


Chef Natascha de los Angeles of Artesanal Sweets is a New york City native born into a family of chefs and artists. With 10 years of French fine dining experience and a life time of exposure to haute cuisine and fine arts, Natascha and Artesanal Sweets "offers couture cakes, cupcakes, cookies, and candy jewerly that are not only visually exciting, but unbelievably fresh and delicious".


Let's be honest. Would you really even care how these beauties tasted if you got the chance to host one on your finger for the night? Not me. "Delicious" would just be a bonus! You can visit Artesanal Sweets and see more of their amazing offerings, here.

Saturday, March 12, 2011

(Etsy Shop} New Meri Meri Party Products Now Available!

I am excited to announce that the Sheek Shindigs Etsy Shop is carrying Meri Meri party products! We are stocking some of their most popular party products, including invitations, cupcake kits, napkins, plates, and other fun party accessories. We will even create a custom Party Package for you! New items will be added soon as well. Please stop by the Sheek Shindigs Etsy Shop and check it out.